jacksontech

ramblings of a security researcher

VR Game Project – Day 3 of 8

Published by Cody Jackson on December 25, 2016 | Leave a response
Adding a UV map in Blender

More progress, although not in the direction I was anticipating!

Bug Fixes and Improvements

The “blink” script continued to be problematic, so I removed the fancy one I grabbed from the Unity wiki and wrote my own very simple one. It works. I will release it CC-BY when I upload the source and build.

I did some “hallway testing” with family members. One of them had trouble getting out of the starting room because the door closed too fast after it opened. Instead of bumping up the delay, I did some hacking and came up with a context-sensitive “polite” door that refuses to close as long as you’re looking at it. Unrealistic? Maybe. Convenient for the game? Very much so! Like the “blink” script, I will release the door controller CC-BY later.

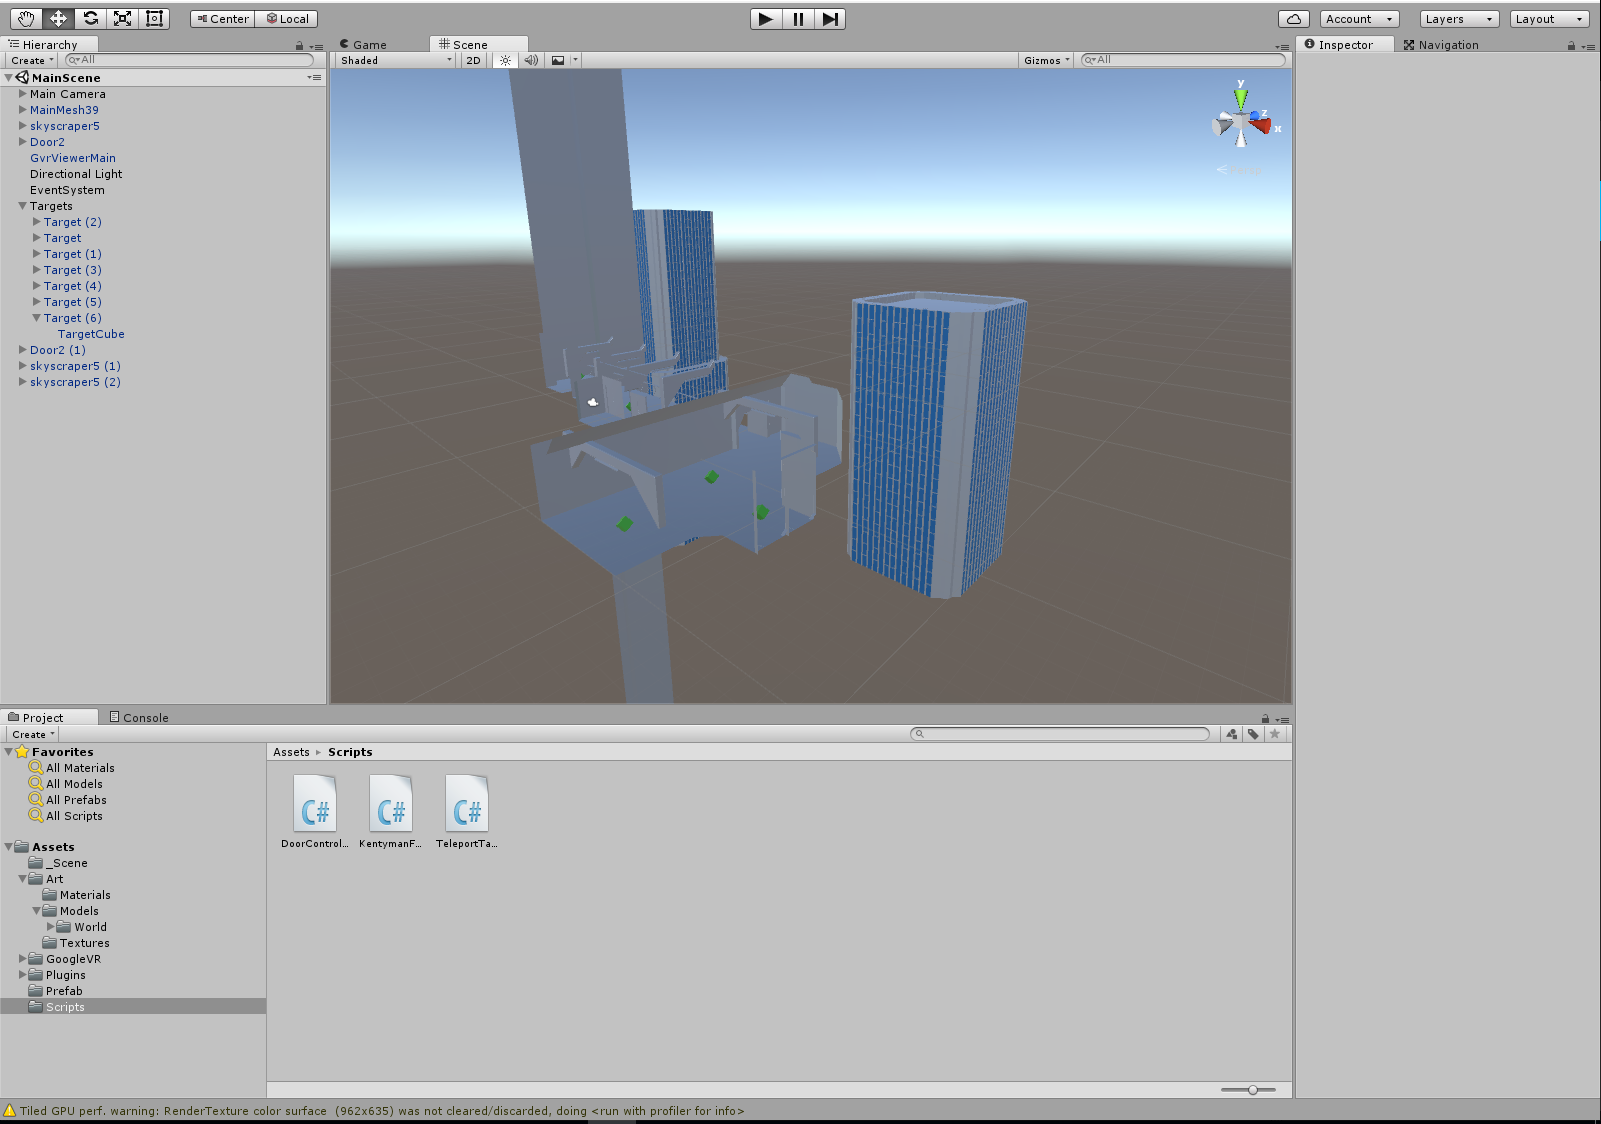
Last, the targets did not fully disable their collider when you teleported to them. I added some code that fixes this.

Lighting

Got lots more lighting done. I figured out my workflow…

  1. Create my models in Blender.
  2. Assign materials to vertices. I tried to keep the names straight so I wouldn’t end up with lots of duplicates (Unity reuses materials after it sees one for the first time, which is kinda nice) but I still ended up with a few typos and duplicate materials. Oh well, lesson learned.
  3. Create a UV map.
  4. In Unity, check the “Generate Lightmap UV” checkbox.
  5. Mark the mesh as static.
  6. Mark all my lights as “bake” vs “realtime”
  7. Disable realtime GI baking in the scene lightmap settings and just leave general GI baking enabled.
  8. Tweak the Baked GI resolution (40-60 seems good for testing; 128 looks reasonable for final builds)
  9. Check “Final Gather” for final builds.
  10. Bake!

Adding a UV map in Blender

Telling Unity to create lightmap UVs.
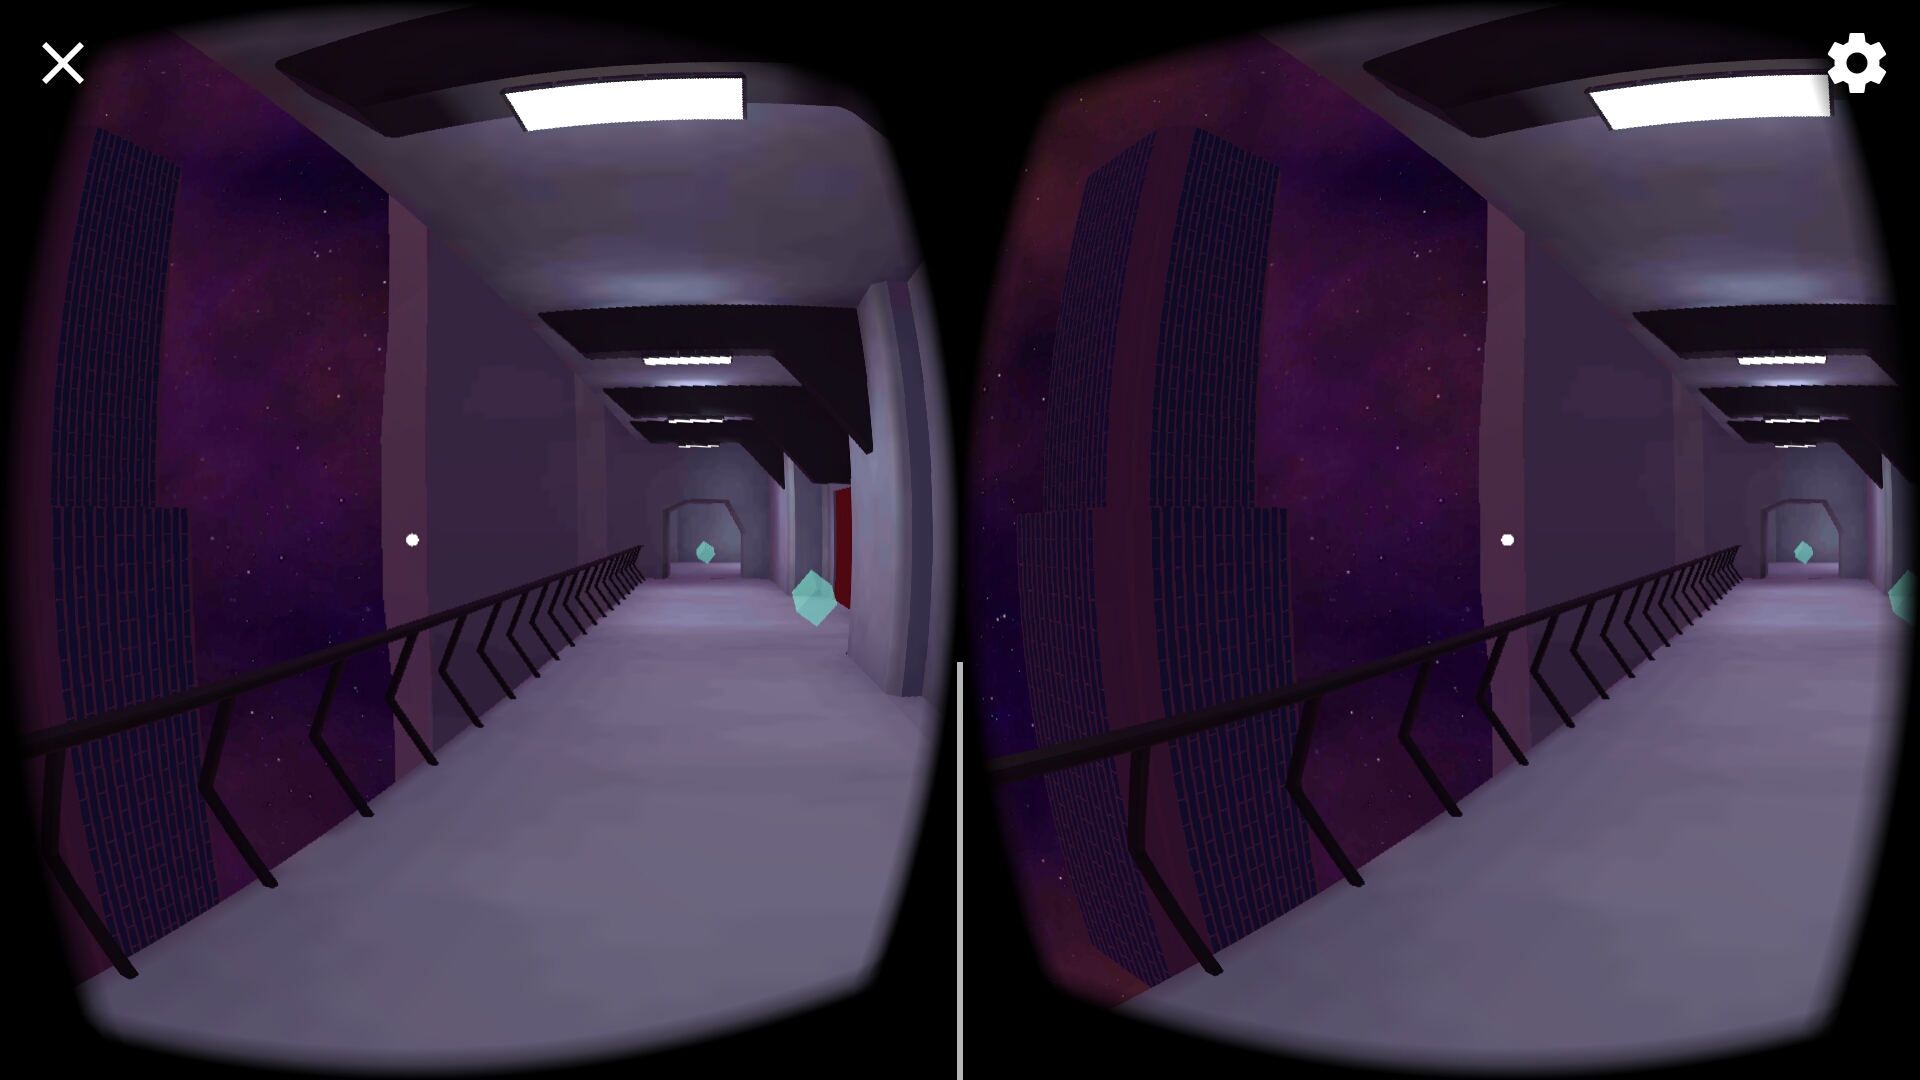
Skybox

It’s wasteful to use 6 huge images, but I did make a skybox using Unity’s skybox shader. I used Ingar’s space sky textures from Unvanquished for now. These are available CC-BY-SA 3.0 and I will make these files available when I realize a build and the source.

Furniture!

A table, a chair, a couch, a bed, a bedside table, two lamps, a computer monitor, a keyboard, a small desk, and a refined version of the curvy desk, all handcrafted with the finest non-GMO free range organic vertices by yours truly.

Screenshots

Here’s the fun bits!

In game screenshot. Office!

In game screenshot. Polite door won’t close until you look away. Just like Wheatley!

In game screenshot. Bedroom lighting.

In game screenshot. You have to find the password!

New version of the office, with fancy chairs.
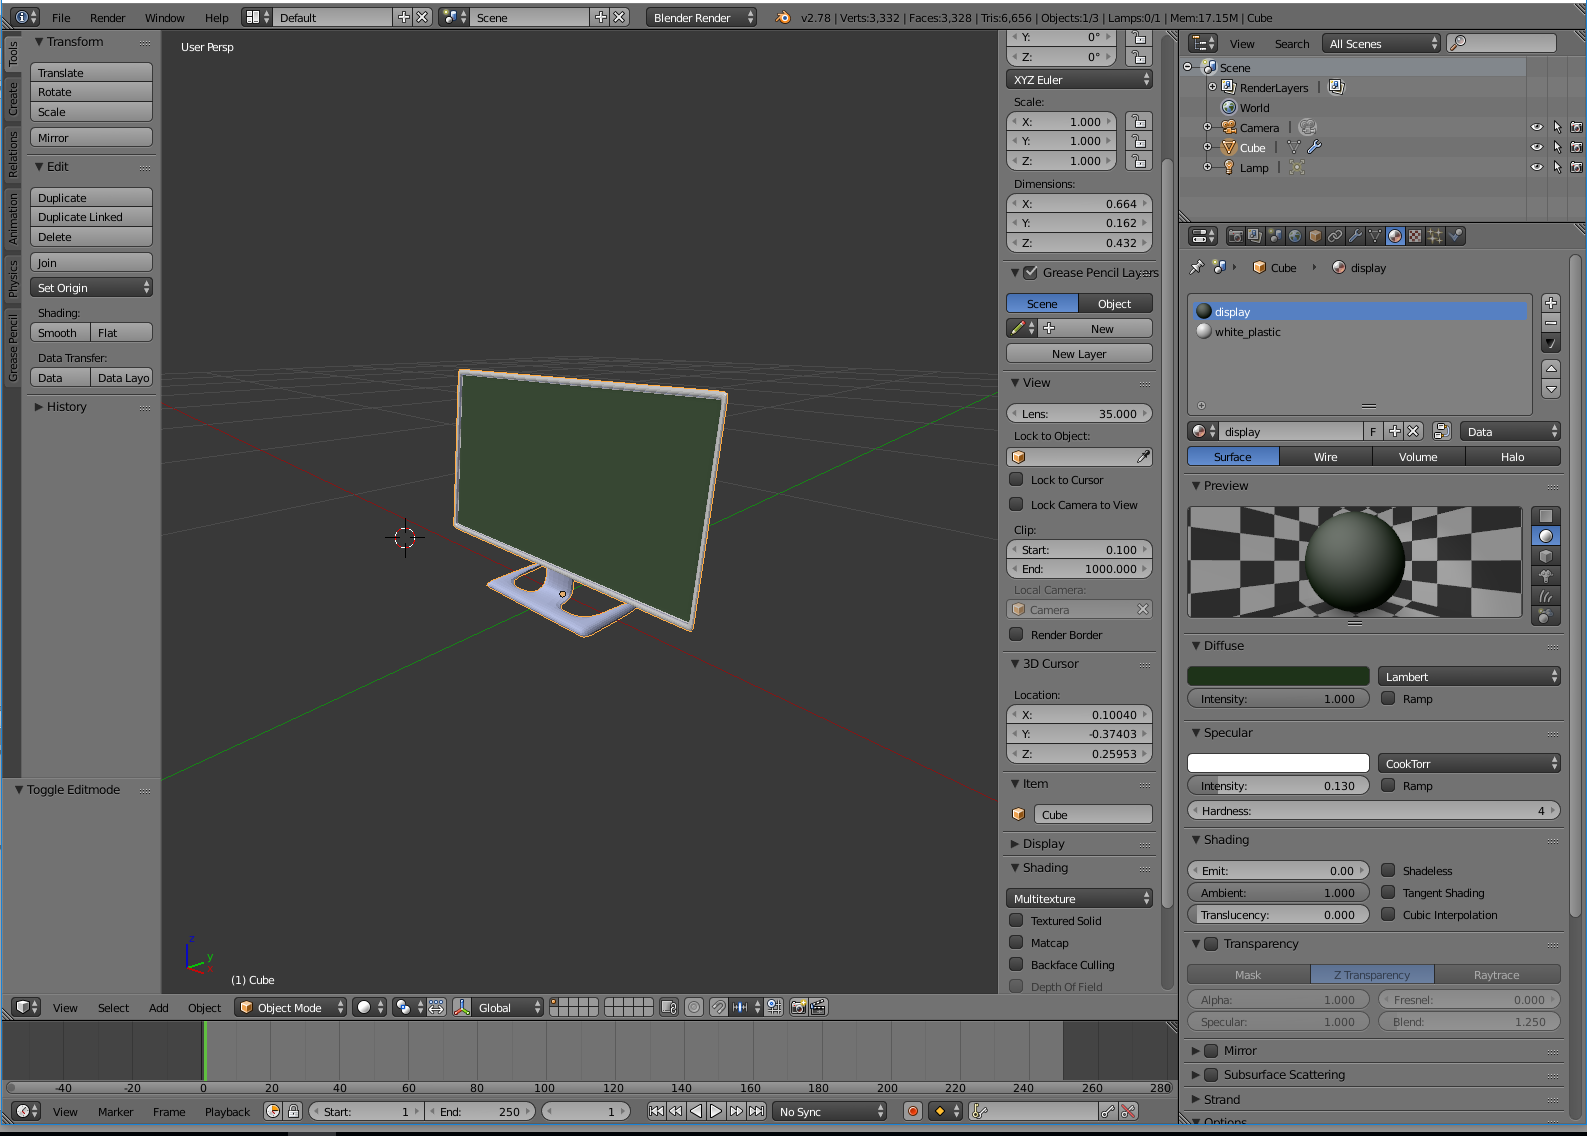
Computer monitor.

General mesh outline. I don’t see me adding new areas in the time I have left in the challenge.

Adding computer monitors.

Second take on the appartment. New furniture!

Early take on some lighting.

Early build with bed.

Tomorrow’s work

  • Dialog system. No, really. I need this.
  • Possibly a cute little robot to sit in the chair. I don’t know. I’ve never successfully animated anything in Blender before.
Posted in Game Dev, Google Cardboard, Personal, Projects, VR | Tagged Eight Day Game Project 1, Game Dev, Google Cardboard, personal, Projects, Unity, VR

VR Game Project – Day 2 of 8

Published by Cody Jackson on December 24, 2016 | Leave a response
The light from the bulbs is going through the light fixture to shine on the ceiling.

Lots of progress today.

Bug Fixes and Improvements

Every so often, my “blink” mechanic was leading to a black screen with no “unblink”. I made some changes that I think have solved the issue. My script removed the targeted cube from the scene when teleporting to it, re-enabling it whenever the user teleported somewhere else. (So the user wouldn’t be standing on a cube.) I think that using setActive(false) on the cube was causing issues. So instead, I enabled/disabled the mesh renderer for that cube. Time will tell if this was the issue. It happened much more on my phone than it did on the PC.

I improved my door controller, adding a checkbox that allowed the door to switch between “toggle” mode and timed-wait mode, the latter of which causes the door to close again after a few seconds.

Audio!

I added sound effects for the door using the Google VR SDK tools. Many thinks to Pempi from the Freesound project for his awesome elevator sound. He says he actually broke into snuck into the mechanical penthouse of a building to record it! Whatever the source, I often use it for both elevators and (with some pitch/length alterations) doors.

Environment Modeling

I blocked in all the major areas where I want gameplay. There are three areas. The first is the long balcony. To the left is a small apartment complex (with one apartment that the player can enter). To the right is the main office for the apartment complex. The idea is that the player will first have to go to the apartment office to get the key to get into the apartment itself, after which point they can look for clues.

Early morning shot of the game environment.

Apartment hallway

Apartment Office

Detail Models

I made a few small detail models, including a desk and a light fixture. I’m planning on creating some couches, tables, bed, lamp, etc for the apartment.

Light Fixture

The desk. I’m super happy with the way it turned out!

Lighting

Ugh. Just, ugh. I was originally going to use Blender to bake lightmaps. However, the indirect lighting feature only supports “approximate” gathering, which makes for some interesting lighting bugs, like this one, where the light is going through the fixture itself:

The light from the bulbs is going through the light fixture to shine on the ceiling.

Strangely, there was a patch that enabled true raytracing for indirect lighting for Blender 2.6. I’m not sure why this was removed for Blender 2.7. I think it’d be very useful!

So, I decided to use Unity instead. I’m not exactly enthused with Unity’s lighting system either–I gather I’m not the only one–but it’s workable.

Here’s some screenshots.

Early take on the lighting on the balcony.

Actual lighting in Unity. Ignore the half-columns. I’m fixing those!

In-Game Screenshots

Early version of balcony, no lights.

Early version of office, no lights.

Balcony with pre-baked lightmaps in Unity.

Office with pre-baked lightmaps in Unity.

Future work

Tomorrow I plan to get a basic on-screen dialog system working, as well as creating some computer and switch props. I haven’t decided if I’m going to put people in the game. Maybe robots! Robots would be easier.

I also need to decide if I want to fight with Unity’s lightmapper more or try to pull off vertex lighting. I don’t think vertex lighting will work very well, but I might give it a shot.

Until tomorrow!

Posted in Game Dev, Google Cardboard, Personal, Projects, VR | Tagged Eight Day Game Project 1, Game Dev, Google Cardboard, personal, Projects, Unity, VR

VR Game Project – Day 1 of 8

Published by Cody Jackson on December 23, 2016 | Leave a response
VR Game Project - Day 1 of 8

Now that it’s winter break, I am going to sit down and do something I’ve been wanting to do for quite awhile: create my own VR game using Unity 3D and Google Cardboard. Thus, I am challenging myself to make a playable game (a short one) in eight days.

The game is going to be a take on a “point and click” game, a-la the old 90s Lucas Arts adventures (like Beneath a Steel Sky). Except set in VR. Movement will be accomplished by “teleporting” (with a blink effect) to reduce VR nausea. The goal of the game is for you, a detective in a futuristic city, to gain access to a missing person’s apartment and find clues on their disappearance. This game is primarily a learning project, but I really want to produce something that people can actually play at the end.

I spent most of the first day brushing up on Unity tutorials and updating my Android environment and Unity setup. At the end of the day, here’s what I accomplished:

1. Movement

Movement was the first hurdle. Some time ago, I had a simple game that used the Google Unity SDK’s IGVRGazeResponder interface to give certain GameObjects actions when the user looked at them and clicked the Cardboard’s button. Since then, Google seems to have made that interface defunct. The new way to do things is to hook into the event system. Here’s how I set up my project:

  1. Import the GVRViewerMain prefab from the SDK.
  2. Import the GVRReticulePointer prefab and make it a child of the camera.
  3. Add the GVRPointerPhysicsRaycaster Script Component to the camera.
  4. Add an EventSystem to an empty GameObject in my hierarchy, and add the GVRPointerInputModule Script Component to the same GameObject.
  5. For all the objects you want to be able to look at/click:
    1. Add some sort of Collider to the object, and mark it as a trigger.
    2. Write some public methods that will be your event handlers in a Script Component.
    3. Add some Event Triggers to the object. I used PointerClick. Make the Event Trigger call your event handler.

A little more involved, but also relatively flexible. My movement script uses the FadeInOut script by KentyMan at the Unity Wiki. Whenever the user clicks on a valid target for teleportation, the game fades quickly to black, repositions the camera, and then fades back in.

Very excite. Such game.

2. Basic World Design and Movable Scenery

I’ve had this idea in my head for awhile: a long balcony that overlooks a vibrant cityscape. Well, okay, right now the cityscape isn’t very vibrant. Okay, fine, I don’t have a cityscape at all. But I have a balcony, and that’s progress, so whatever.

I designed the balcony in Blender and imported it into Unity. I am using no textures at the moment; right now, the emphasis is on geometry and sketching out the main areas for the gameplay. (It’s going to be really small.) If I have time, I will probably bake lighting in Blender and then either import as lightmaps or (if I can swing the low-poly aesthetic), bake the lightmaps to vertex colors and not use any textures at all. My phone will probably thank me for the latter. We’ll see!

Last, I really wanted to get something moving, so I added sliding doors. I did this by calculating the target positions of each half of the door and then Lerp-ing between the start and end as a function of progress, calculated as (end movement time – start movement time) / duration. For extra fun, the Lerp-ing is nonlinear by using a smoothing function in place of a straight time parameter, so the door speeds up and slows down nicely.

Picture of a walkway with green triangles as teleportation targets

The green objects are teleportation targets.

3. Day 1 Results

Here’s the results of my labors running on my phone:

It looks much cooler with a headset.

At the end of the project, I will make some or all of the project available for others to study.


Posted in Game Dev, Google Cardboard, Personal, Projects, VR | Tagged Eight Day Game Project 1, Google Cardboard, Unity, VR

Freeway Alpha 1

Published by Cody Jackson on December 20, 2016 | Leave a response
Freeway Alpha 1

Freeway, the city map I’ve been working on for Unvanquished, had its first alpha release today. This is a very rough release intended primarily for gameplay testing. Once the level design flow has been finalized, I can go in and add details, sound, scenery, etc.

Screenshot

Download

Download here


Posted in Game Dev, Projects, Unvanquished | Tagged gamedev, level design, project, Unvanquished, Unvanquished Map

OpenWRT on a “locked down” TP-Link WR1043ND v3 wireless router

Published by Cody Jackson on July 7, 2016 | 4 Responses

It turns out that the brouhaha over certain manufacturers’ reactions to the FCC ruling to prevent 3rd-party software from taking wireless routers out of their approved emissions range is valid. I bought a TP-Link WR1043ND v3 router to compliment the existing v2 router I bought several years ago. I have a point-to-point setup with OpenWRT on both ends. It turns out that TP Link has indeed started locking down their routers to prevent third-party firmware installations. (I had hoped that buying the older V3 would get around this, but apparently not so.) Setting up OpenWRT is now a little bit (but not much) more difficult than it was on these routers.

Fortunately, it seems that TP-Link has only locked down the web interface to prevent third-party firmware installation and downgrading factory firmware. You’ll get an error 18005 if you try this. TFTP still works. In the end, the steps to flash were the following, based on the information at the OpenWRT wiki. You’ll need a Linux machine with DNSMasq installed.

  1. Download the factory OpenWRT trunk image for the WR1043ND v3. Currently as of July 7, 2016: https://downloads.openwrt.org/snapshots/trunk/ar71xx/generic/openwrt-ar71xx-generic-tl-wr1043nd-v3-squashfs-factory.bin
  2. Rename the OpenWRT file to wr1043v3_tp_recovery.bin
  3. Move the file to /tmp
  4. Set your NIC’s address to 192.168.0.66 and hook up the router, but don’t power it on yet.
  5. Use DNSMasq as a quick tftp server with the following command: dnsmasq -d –enable-tftp –tftp-root=/tmp
  6. In another terminal window, use tcpdump to view traffic on your NIC.
  7. Hold down the router’s reset button and power it on.
  8. Hold the reset button until tcpdump shows the file transfer.
  9. Wait 5 minutes

The OpenWRT build doesn’t have the web GUI installed. Fortunately, that’s easy to fix:

  1. Use SSH to log into root@192.168.1.1
  2. Hook the router’s WAN port to a LAN switch (to give it Internet access)
  3. Run opkg update && opkg install luci on the router
  4. Run reboot on the router
  5. Visit 192.168.1.1 and enjoy
Posted in Computer Tech, Linux, Networking | Tagged fcc, openwrt, router, tp-link, wr1043nd, wr1043ndv3

The Importance of an Open Mind: Adventures with ASP.NET

Published by Cody Jackson on June 27, 2016 | Leave a response

Cross-posted from LinkedIn.

One of the highlights of the computer science program at California State University, Sacramento, is its senior project. This two-semester capstone course gives soon-to-be graduates a taste of industry-standard software engineering practices; students tackle a real-life software development project from inception to delivery.

It sounds great on paper. What I didn’t realize until recently was that it turns out great in practice, too.

I approached the class methodically, warily; it has, shall we say, a reputation among the undergrads. I got together with some of the most capable classmates I knew and we formed a team; soon after, we had secured a project sponsorship to design a web-based scheduling system for one of the campus departments.

We spent the first semester planning (as the course encouraged us to do; it was later changed to a more Agile methodology). We were going to make the scheduling system as a Java web app with a MySQL database backend. The entire team was familiar with Java, since most of the computer science curriculum revolves around it; most of us knew MySQL as well. It’d be a cakewalk. Slam-dunk. We had this. We could do this.

The second semester rolled around. Right as we were about to start implementation, our team was informed that, oops, no, sorry, you’ll need to do this in ASP.NET WebForms and SQL Server instead.

None of us had ever dealt with these technologies before.

We had an all-hands-on-deck meeting after that little detail was revealed. It was full of words like “we can’t” and “we don’t know that”. We argued. We pleaded. But the requirement was firm; the people responsible for maintaining the app after we finished it required it to be in ASP.NET. It took several weeks to accept that our dream of a Java/MySQL app had been shot down before it even cleared the runway, and by then, the clock was ticking uncomfortably fast. We learned ASP.NET and SQL Server as quickly as possible, but it was too little, too late. The project went down faster than any of us could have imagined. In the end, we delivered a half-baked product that was only partially functional.

Why? What happened?

Looking back, I think a lot of it had to do with attitude. Closed-mindedness. Many of the students at CSUS (myself included at the time) were Linux geeks; Microsoft was evil and Apple was for hipsters. Being forced to use a Microsoft product was simply unacceptable! We couldn’t do it! We didn’t have the background! (Never mind that C# is absurdly close to Java and SQL Server is a close cousin of MySQL.) We didn’t even have Windows machines! (Except for my laptop, but that was for school stuff, obviously, and my desktop, well, that was for gaming, I couldn’t spare the disk space for Visual Studio…)

I said it was “impossible.” What I really meant to say was “I don’t want to do it because I really dislike the technologies.” Never mind that I hadn’t one iota of experience with any of the technologies!

Dolly back, fade to black. (Just like Steely Dan.) Fast-forward a year to my first day working at Intel as an intern. After I’d gotten my docking station set up and gotten the obligatory adjustable-height desk tuning out of the way, one of my new coworkers approached, a sly grin on her face and a hopeful gleam in her eye.

“I have a project for you,” she said. I couldn’t believe my luck–the very first day! I followed her to a conference room, we sat down, and talked about what I’d be working on for the next month or so.

Can you guess what it was?

If you’re thinking, “Obviously a Java app, after all, that’s what you spent most of your time learning at CSUS,” then congratulations; you’re fully resistant to reverse psychology! You’re also wrong, sorry about that. The answer, of course, is an ASP.NET web app. The whole kit and caboodle: C#. WebForms. And SQL Server.

This time, I approached the project with a different mindset. Instead of “I can’t do this,” I thought, “This is a great opportunity to extend the bits of ASP.NET and SQL Server I picked up in senior project.” What a difference it made! Now, a month later, I’ve deployed my own ASP.NET MVC web app that adds functionality to the original project using JQuery and a simple RESTful API. I’ve tuned the SQL Server database, designed my own queries to pull useful information out of an unfamiliar schema, and drafted a migration plan to a more powerful server. A far cry from “can’t.”

This is what I missed when I took senior project. My mind was closed. I should have taken it as an opportunity to grow and expand my knowledge in a safe environment—the true, practical purpose of the class. Yet still, the experience wasn’t a waste, not in the least. It taught me what a difference one’s mindset can make. Open your mind, and opportunities will follow.

Oh, and for those of you reading for the ASP.NET tag, some cool news: Microsoft released their open source .NET Core 1.0 today. Hardly the “evil” company I thought it was in my youth!

Posted in Computer Tech, Education, Personal | Tagged asp.net, lessons learned, personal growth

Voxel Engine Project: AIBlocks

Published by Cody Jackson on February 28, 2016 | Leave a response
Textures courtesy of public-domain SoarTex pack

AIBlocks

This is the first in a series of posts describing my current development project, AIBlocks. It is a voxel game engine (similar to Minecraft) that I am developing to study various techniques for procedural world generation, networked game systems, video game artificial intelligence, and Java optimization. I’m also brushing up on my OpenGL knowledge and getting some valuable practice using modern software design techniques and patterns.

AIBlocks grew out of a project for an Artificial Intelligence course (CSc 215) at CSU Sacramento. It was initially a study in A* pathfinding, but quickly grew over the course of a week into a small OpenGL-powered game engine that looks (coincidentally, of course) like a certain very popular video game. These blog posts document my progress and interesting problems I’ve encountered, as well as related research.

Project Status, February 2016

Here’s what the project looks like currently:

Image of textures

Textures courtesy of public-domain SoarTex pack


Screenshot of terrain

Procedurally generated terrain using OpenSimplex noise. Fully pathfindable.


Image of a-star pathfinding

Pathfinding in a procedurally-generated 3D environment using A*


Image of pathfinding

More 3D pathfinding


Current Features

  • Infinitely-generated terrain (a-la Minecraft) using OpenSimplex noise.
  • Brute-force meshing algorithm to remove unseen faces.
  • AI pathfinding using A*.
  • Entities that can jump to navigate terrain.
  • Passable terrain physics for players and entities.

Technical Details

The engine is implemented using OpenGL 2.1 (plus VAO extension) via the Lightweight Java Game Library, version 2. I targeted OpenGL 2.1 so the engine would run on my laptop, which has a 1st gen Intel HD Graphics integrated GPU. However, after seeing the abysmal performance of that GPU, I will probably drop support for older versions of OpenGL and move up to OpenGL 3.x. The engine is very performant on an Intel Atom + 4th gen Intel HD Graphics tablet, getting 60FPS even on battery, at least until you explore enough terrain to make it bog down.

Terrain is generated using a public-domain OpenSimplex Noise implementation that generates a heightmap on the fly from a seed. (No caves yet!)

Roadmap

AIBlocks started as a “what-if” project, and I didn’t plan it out very well; my goal was essentially “see what I can make in a day”, which grew to two days, then three…

While this was a great way to impart impetus on an exploration-style project like AIBlocks, random flailing and “chasing the shiny” wasn’t going to see the project through to completion. At the very least, I needed goals that I could break down into smaller tasks to focus on one at a time. Even better would be an end goal so I could declare the project done (or as close to done as possible) at some point in the future. So I sat down and laid out some constraints for the project.

Major “must-have” features:

  • Terrain generation: done!
  • NPC Pathfinding (A*): done!
  • NPC behavior (Behavior Trees, Boids)
  • Block placement/removal
  • Very simple combat system

“Nice-to-have” features:

  • Improved engine architecture (I’m eying Entity-Component systems)
  • Biomes
  • Cave generation
  • Generated world structures (houses, etc): partially done if you consider trees.
  • Networked support for multiple players
  • World saving/loading

“Definitely not doing unless I get lots of free time” features:

  • Mining mechanics
  • Crafting recipes
  • XP
  • Enchanting
  • Basically anything else from Minecraft

The project covered a lot of ground (no pun intended) since I started it a few weeks ago. The next few blog posts will be retroactively analyzing various parts of the engine before I move on to new features.


Posted in AIBlocks, Personal, Projects | Tagged ai, aiblocks, artificial intelligence, games, java, minecraft, programming, project, video games

Cubieboard2 and Cubian stability

Published by Cody Jackson on January 19, 2016 | Leave a response
Nokia for scale

A friend just sent me two Cubieboard2 development boards. These little devices are slightly larger than a credit card and are similar to the well-known Raspberry Pi series of miniature computers.

Cubieboard image

Nokia for scale

The Cubieboard2s have the following specs:

  • Allwinner A20 dual-core 1GHz SoC
  • Mali-400MP2 GPU (1 vertex core, 2 fragment cores)
  • 1GB RAM
  • 2x USB
  • microSD slot with support for <=32GB cards
  • 4GB embedded NAND flash
  • HDMI out
  • Standard headphone/microphone jacks

All in all, a pretty nice set of hardware squeezed into a tiny device.

The Cubieboard2 is supposed to come with Android 4.x on its NAND, but since these devices are used, the NAND was wiped. No problem; I opted to install Cubian X1, a set of Cubieboard support packages on top of an ARM Debian build, onto a 32GB microSD card. I wanted to see if I could use the tiny Cubieboard2 as a replacement for my power-hungry desktop, so I decided to install the full desktop version, which comes with LXDE.

Installation is easy using the standard Linux tool dd on another computer. Connect the microSD card to your computer using a card reader and run the following commands, replacing sdX with the proper device letter for your microSD card:

dd if=/path/to/cubieboard.img of=/dev/sdX bs=4k
sync

Getting the boards to boot proved to be more difficult. The first board I tried froze at different places during bootup, only occasionally getting to the login screen. Thinking it was a bad microSD card, I tried another card–same problem. I also tried the 2nd Cubieboard and got the same results; Cubian hung on boot.

Some Google sleuthing yielded this page, which describes a fix. Most (all?) Allwinner devices use a binary file called script.bin to initialize the board, setting things like core voltages and memory speeds. Apparently the released version of Cubian X1 optimistically tries to set voltages towards the low end of the usable range on the A20 SoC, and marginal units will sometimes hang or otherwise misbehave. The solution is to patch the file using slightly higher voltages (25-50mV higher core and memory voltages). I used the provided precompiled file and dropped it into /boot using a microSD card reader, and the problems were gone.

If you have a unit that is misbehaving, you can also decompile the script.bin file yourself and apply the changes. To do so, you’ll need to set up sunxi-tools. Follow the directions on the page to set up the tools, then run bin2fex on script.bin to decompile it to a .fex text file. Apply the patch, blob the .fex file back up with fex2bin, and drop the file back in /boot.

Stay tuned for future posts on getting the Lightweight Java Game Library to run on the Cubieboard!


Posted in Computer Tech, Linux | Tagged cubian, cubieboard, embedded, hardware, linux

Blog back online!

Published by Cody Jackson on November 11, 2015 | Leave a response

The SSL certificate for this blog expired a few days ago; it took me awhile to notice and get a new one signed by StartSSL. Now we’re back online!

Posted in Computer Tech, Networking, Personal, Security | Tagged blog, https, security, ssl

SunFire x4150 Server and HP P410 SmartArray Issue

Published by Cody Jackson on September 5, 2015 | 3 Responses
SunFire x4150 Server and HP P410 SmartArray Issue

A friend offered me the chance to get my hands on a Sunfire x4150 1U rack server for the cost of shipping. I snatched it up and a few days ago the machine arrived on my doorstep.

x4150 image

Ooo shiny

Specs:

  • 2 Xeon x5460 quad-core CPUs at 3.16GHz
  • 8GB DDR2 ECC RAM (soon to be upgraded to 20GB)
  • 8 146GB 10K RPM SAS drives attached to an Adaptec STK RAID controller card
  • 16 40mm dual-rotor cooling fans, because if you’re going to sound like a jet engine, you might as well go all out.
  • 2 redundant 650W hot-swappable PSUs

There’s not much to say about the server itself. It’s a rack server. It’s (exceptionally) loud. It draws a lot of power (500W under full load). It’s easy to work on and it’s built for high availability. (For example, 14 of the fans can be swapped out while the server is running, and it seems that the server has enough cooling capacity to keep running even if a few of the fans are offline.)

While setting it up, the Adaptec RAID controller whined that its battery was missing or damaged. The RAID controller has a battery-backed cache, which speeds up write operations considerably. When the OS requests a write, the controller immediately returns success, freeing up the OS to do other things, while in fact the controller is storing the write request in a DRAM cache until the disks can get around to it. A power outage at an inopportune time can wipe the temporary cache and nuke whatever write operations were pending. Most controllers have a battery or capacitor to power the cache through medium-duration power outages (a day or two).

With the Adaptec’s battery out of commission, the write cache was disabled. Such slow. Wow performance tanked. Much complaining RAID controller. I popped the top lid off the server and removed the card; the Lithium-Ion battery was bloated. Dead, dead, dead.

Another friend/hardware sugar daddy found an HP P410 SmartArray controller and sent it my way as well. The P410 has an external battery pack; finding a place to tuck it in a 1U rack server that wasn’t designed for it was interesting. Right now it’s sitting on top of the motherboard. Fingers crossed that it won’t break off anything.

There’s one problem with the P410: it refuses to allow me into its BIOS. I can’t enter its configuration utility to set up the array. The P410 is supposed to pop up a message prompting me to press F8, but it doesn’t. The card runs its OptionROM, pauses as it takes its time “Initializing…” the card, and immediately goes to the next screen.

Fortunately, there’s a way around this. HP offers an offline Array Configuration Utility, which is a live CD that allows you to configure the controller. I downloaded an old version here (8.75.12.0 [22 Jun 2011], newer versions seem to have dropped support for the P410) and ran it. It seems you need a license key for RAID6/60, but I was happy with RAID10 + 2 spares, so I didn’t need a license.

Once I got the array configured, the controller detected the logical drive just fine at boot and soon I had ESXi installed.

My theory is that there’s an incompatibility between the x4150’s BIOS and the P410’s BIOS. The x4150 seems to grab the F8 key for its boot-device selection menu. I don’t know what the equivalent key is on HP servers. It’s possible a firmware update for the card would fix this, but I haven’t tried that yet.

Regardless, if you’re trying to use a HP P410 SmartArray controller in non-HP hardware, try the above configuration utility. There may also be OS-level tools you can use to manage your array after you’ve set it up for the first time.

Posted in Computer Tech | Tagged hp, p410, raid, server, x4150
← Previous 1 2 3 … 6 Next →
email me my linkedin twitter google plus github

Pages

  • About
  • Articles and FAQs
  • Furry Octo Pancake
  • Minecraft Map
  • QuotaMonitor
  • Virtual Reality
  • Your Privacy

Archives

  • May 2018
  • May 2017
  • March 2017
  • January 2017
  • December 2016
  • July 2016
  • June 2016
  • February 2016
  • January 2016
  • November 2015
  • September 2015
  • August 2015
  • July 2015
  • June 2015
  • May 2015
  • March 2015
  • December 2014
  • October 2014
  • July 2014
  • May 2014
  • March 2014
  • January 2014
  • December 2013
  • November 2013
  • September 2013
  • August 2013
  • July 2013

Categories

  • AIBlocks
  • Computer Tech
  • Education
  • Game Dev
  • Google Cardboard
  • Linux
  • Minecraft
  • Networking
  • Personal
  • Projects
  • Security
  • Uncategorized
  • Unvanquished
  • VR

Meta

  • Log in
  • Entries feed
  • Comments feed
  • WordPress.org

Copyright © 2025 Cody Jackson jacksontech.

Powered by WordPress and Plain WP.

Disclaimer: The information expressed here is for educational purposes only; most of it was gathered through experiments or trial-and-error. I hope it's useful in some way, but I don't promise it's suitable for any purpose. I can't guarantee that it is correct, either! Use the information presented here at your own risk. If something breaks, you'll have to glue the pieces back together as best you can...

Opinions expressed here are my own, nobody else's.