Voxel Engine Project: AIBlocks

AIBlocks
This is the first in a series of posts describing my current development project, AIBlocks. It is a voxel game engine (similar to Minecraft) that I am developing to study various techniques for procedural world generation, networked game systems, video game artificial intelligence, and Java optimization. I’m also brushing up on my OpenGL knowledge and getting some valuable practice using modern software design techniques and patterns.
AIBlocks grew out of a project for an Artificial Intelligence course (CSc 215) at CSU Sacramento. It was initially a study in A* pathfinding, but quickly grew over the course of a week into a small OpenGL-powered game engine that looks (coincidentally, of course) like a certain very popular video game. These blog posts document my progress and interesting problems I’ve encountered, as well as related research.
Project Status, February 2016
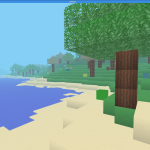
Here’s what the project looks like currently:
Current Features
- Infinitely-generated terrain (a-la Minecraft) using OpenSimplex noise.
- Brute-force meshing algorithm to remove unseen faces.
- AI pathfinding using A*.
- Entities that can jump to navigate terrain.
- Passable terrain physics for players and entities.
Technical Details
The engine is implemented using OpenGL 2.1 (plus VAO extension) via the Lightweight Java Game Library, version 2. I targeted OpenGL 2.1 so the engine would run on my laptop, which has a 1st gen Intel HD Graphics integrated GPU. However, after seeing the abysmal performance of that GPU, I will probably drop support for older versions of OpenGL and move up to OpenGL 3.x. The engine is very performant on an Intel Atom + 4th gen Intel HD Graphics tablet, getting 60FPS even on battery, at least until you explore enough terrain to make it bog down.
Terrain is generated using a public-domain OpenSimplex Noise implementation that generates a heightmap on the fly from a seed. (No caves yet!)
Roadmap
AIBlocks started as a “what-if” project, and I didn’t plan it out very well; my goal was essentially “see what I can make in a day”, which grew to two days, then three…
While this was a great way to impart impetus on an exploration-style project like AIBlocks, random flailing and “chasing the shiny” wasn’t going to see the project through to completion. At the very least, I needed goals that I could break down into smaller tasks to focus on one at a time. Even better would be an end goal so I could declare the project done (or as close to done as possible) at some point in the future. So I sat down and laid out some constraints for the project.
Major “must-have” features:
- Terrain generation: done!
- NPC Pathfinding (A*): done!
- NPC behavior (Behavior Trees, Boids)
- Block placement/removal
- Very simple combat system
“Nice-to-have” features:
- Improved engine architecture (I’m eying Entity-Component systems)
- Biomes
- Cave generation
- Generated world structures (houses, etc): partially done if you consider trees.
- Networked support for multiple players
- World saving/loading
“Definitely not doing unless I get lots of free time” features:
- Mining mechanics
- Crafting recipes
- XP
- Enchanting
- Basically anything else from Minecraft
The project covered a lot of ground (no pun intended) since I started it a few weeks ago. The next few blog posts will be retroactively analyzing various parts of the engine before I move on to new features.
Galileo temperature sensor code now on Github
I cleaned up the Python source code for the Intel Galileo temperature sensor I blogged about earlier this summer, and pushed the source up to my GitHub account. The code is very brute-force and make-do (it was written in a very short period of time during a very crazy semester and hasn’t been touched since) but I think it will be more useful online than sitting on my drives.
The temperature sensor is a TMP36 analog temperature sensor. I followed the directions at Adafruit to assemble a circuit and hook it up to my Galileo Board 2. I used the same circuit diagram as shown–the Galileo Board series and the Arduino shown are electronically compatible–although I added a 0.1uf capacitor between VCC and GND as suggested by a commenter at SparkFun and the TMP36 datasheet to cut down on noise. (No, I’m not sure this is necessary, but the capacitor was cheap and the resulting measurements seemed accurate within a degree or so. Maybe I should take some EEE classes next semester to find out what it’s actually doing?)
The daemon itself is written in Python 2 and runs under Yocto Linux (the Intel-provided full-sized Linux SD card image for the Galileo Board 2). A LSB script does a little configuration in /proc to give access to the analog input pins and then starts the daemon. The daemon listens on port 8080 for HTTP requests and serves up temperature data for the past 15 minutes, the past hour, the past day, and the past week, returning the data as a JSON feed that can be graphed by a library like MetricsGraphics.
Instructions for setting up the daemon are on the GitHub page. You’ll need the Galileo SD Card Image to install Yocto Linux. The newest version, 1.0.4 at the time of writing, is much smaller than the version I have. You made need to go to the old downloads page and download version 1.0.3 if the newest version does not have Python available.
In case you missed it, the feeds from the project can be seen in graph form here.


